| |
|
| |
 |
 |
 |

|
|
| |
 |
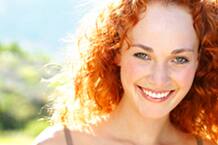
Glamour Makeover
Give portraits
the spa treatment
Have you ever wanted to turn a photo into a magazine cover shot? With Corel® PaintShop Photo Pro X3 it's easy.
Photographer Craig Ferguson walks us through the steps for taking an ordinary photograph and giving it a glamour makeover.
|
|
In this three-part tutorial, we'll take a look at how to retouch a portrait to adjust the lighting, improve skin and enhances eyes and hair. And be sure to check out Craig's tips for taking better portraits.
 Download the "before" image to use in this tutorial. Download the "before" image to use in this tutorial.
|
 |
 |

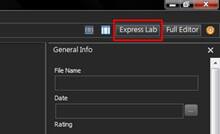
Before we can move onto the retouching of our subject, we need to get the photo looking its best. The Express Lab offers the quickest tools for adjusting exposure
-
Open PaintShop Photo Pro X3 and click on the Organizer tab top right. Select the image you want to work on in the Organizer. Click on the Express button on the top right of the screen.
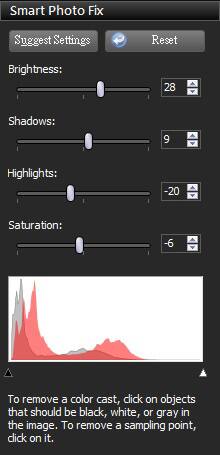
Once the Express Lab opens, we can choose the Suggest Settings button for an initial automatic adjustment.
-
Underneath the sliders on the right, you can see a histogram graph. The left side of the histogram is dark shadow and the right is bright highlight. Under each side is a small triangle. A nice even exposure will see the edges of the box line up with the histogram.
In this photo we simply drag the white triangle to the left to spread the histogram more evenly. This will cause the picture to become brighter.
 |
 |
 |
 |
 |
Tip: Enable the histogram on your camera and take a quick glance at it after you take a picture. Use the exposure compensation feature on your camera and retake as necessary. Cameras don't capture detail evenly the further to the RIGHT the histogram lies, the more picture detail there is. If the histogram is to the left, use + exposure compensation. If it's bunched up against the right, use exposure compensation. |
 |
 |
|
 |
- Once we've adjusted the histogram level, we can fine-tune some crucial values with the sliders. In this case we want to boost overall brightness, but we want to make sure we don't lose detail in the highlights on her cheeks, so set them as follows:
|
Brightness: 28
Shadows: 9
Highlights: -20
Saturation: -6 |
- Click the Save As icon bottom left and save the image under a new name. Then click the Exit Express Lab button in the lower right of the screen and go back to the Full Editor.
|
 |
|
|
|
Tip: PaintShop Photo Pro has an Auto Preserve Originals function. This will save an original untouched copy, which can be handy if we later decide we want to make different changes or want to go back to the original. |
|
|
|
|
 |
|
 |
| |
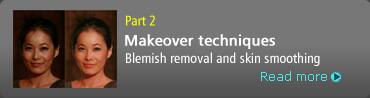
Blemish Removal
With the photo open in the Full Editor, we are ready to move into the retouching stages.
|
|
|
|
|
Tip: To move around the image we can press the spacebar to bring up the Pan tool (it looks like a hand) and click-drag around the photo. |
|
|
|
|
|
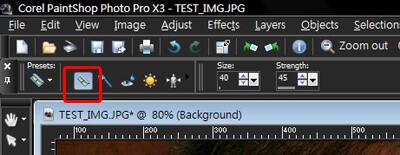
Now it's time to clean up general blemishes on the skin. Move into the Learning Center on the left of the screen and choose the Retouch and Restore button. A new series of options will open up and here we can select Makeover.
Skin smoothing
-
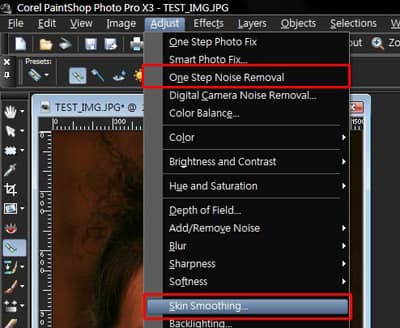
Before fixing specific blemishes, it is recommended that we do a "One step Noise Removal" and a "Skin Smoothing" first. Go to the Adjust drop-down menu and click One step Noise Removal, and then Skin Smoothing.
-
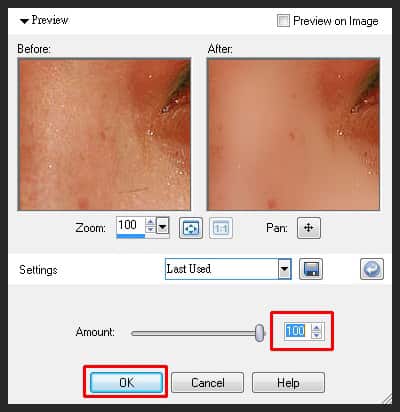
In the "Skin smoothing" dialog box, adjust the Amount to 100, then click OK.
Now it's time to clean up general blemishes on the skin. Move into the Learning Center on the left of the screen and choose the Retouch and Restore button. A new series of options will open up and here we can select Makeover.
Blemish Fixer
-
The first step is to use the Blemish Fixer. This cleans up and removes blemishes, freckles and the like.
-
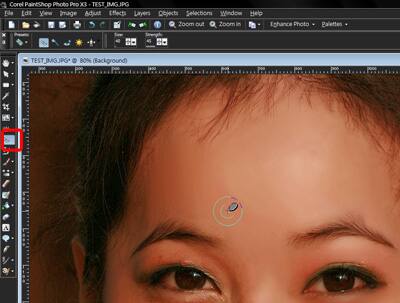
You can see in the screen that there are two circles with a + in the center. The inner circle what will be changed and the outer circle is what will be sampled for smooth blending of the skin tones. Adjust the size so that the inner circle is just covers the average blemish. I used a setting of about 40 in the beginning, and adjusted the size from time to time to fit the environment.
-
Removing a blemish is as easy as child's play. Just center the tool over the blemish and click. Continue with this operation until you are satisfied that all major freckles, stray hair, and small surface wrinkles have been removed. Note that the model also has some marks on her neck.
-
The blemish tool is also good for toning down the shiny spots on her forehead and nose.
-
In the example here I've set the Blemish Tool strength at 45. Sometimes this might appear too strong or too weak, so you might want to adjust it from time to time.
|
|
|
|
|
Tip: when removing blemishes, you could scroll your mouse to enlarge the window for a better view and details. The Blemish Fixer is also really great for removing some unwanted hairs! |
|
|
|
|
Working with layers
-
Now we want to finally even out the skin tones and give it a nice soft-focus "glow". The best way to do this is to apply a controlled Gaussian blur to the skin. However, we don't want the entire photo to become blurred, so we apply the blur to a layer, giving us more control over the areas it affects.
-
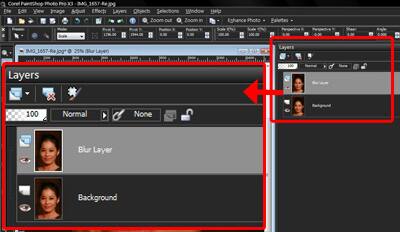
First we Select All, or simply right-click the image and select Duplicate. This creates a new layer. In the Layers Palette on the right, you can right-click on this layer and rename it Blur layer.
-
Now go to Adjust / Blur / Gaussian blur, and apply a radius of 5.

-
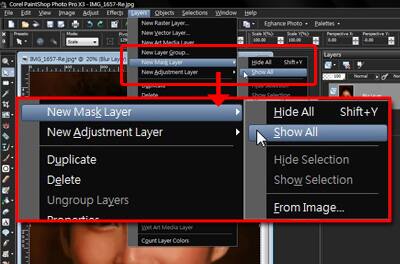
Now we see that the entire photo is blurred, but we want to keep the features like eyes, mouth and hair sharp. To get these back, we need a mask.
-
From the Layers menu, select New Mask Layer. Select Show All, to see all the layers.
-
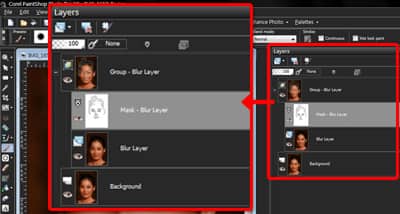
Select the Paintbrush tool on the left, and adjust the size to be about the same size as the eye.
-
Now draw over the eyes, mouth, hair and eyebrows, adjusting the size of the brush as you go. This essentially removes parts of the blur layer, showing the base image through the blur. In the Layers palette on the right you can see the various layers.
-
At this point you can save your image as a .jpg, which will automatically merge (flatten) your image, or save it as in PSPIMAGE format, which will maintain the layers.
That brings us to the end of this part of the Makeover tutorial. Stay tuned for the continuation as we look at a few more options for retouching portraits.
|
|
 |
| |
The previous tutorials have looked at adjusting the exposure and brightness, and then smoothing skin and removing blemishes and unwanted hair. In this part, we are going to look at techniques for enhancing eyes and hair.
-
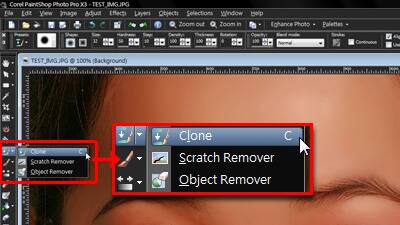
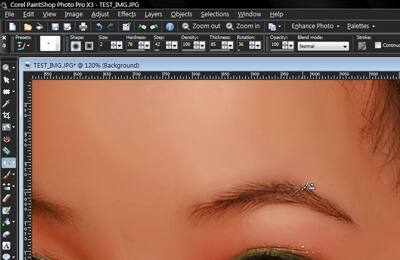
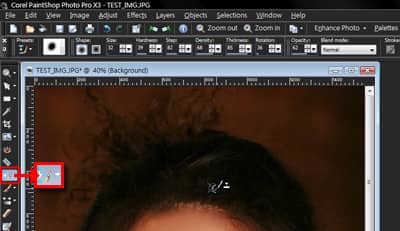
First were going to enhance the eyebrows for a fuller look. Select the Clone Brush from our tool menu.
-
Reduce the size of the brush to about 2, then zoom in on an eyebrow and simply right-click along the hair line of her eyebrow. This will sample some color information from that area. Then drag the cursor over the skin to draw an extended eyebrow outline. The tone from the surrounding hair will be copied over the skin, covering it up. You may need to try this a few times to get the colors to match exactly. You can blend in the outline you've drawn using the Blemish tool.
-
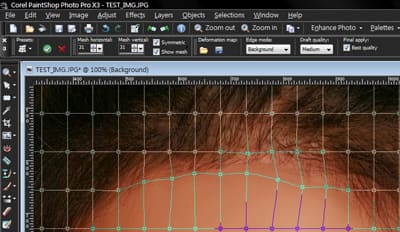
Next we want to slightly enlarge the eye and adjust the shape of her eyebrows. Select the Mesh Warp tool, which overlays a mesh grid on her face.
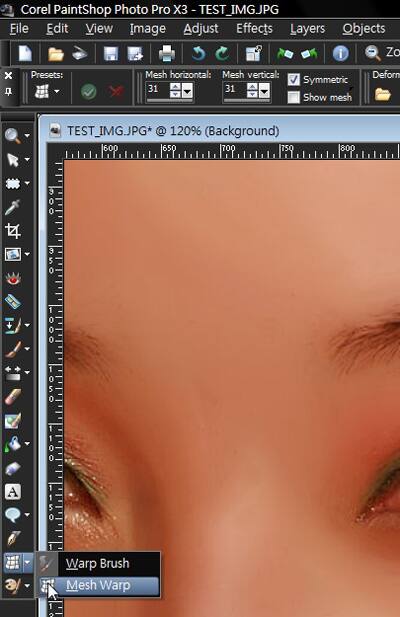
-
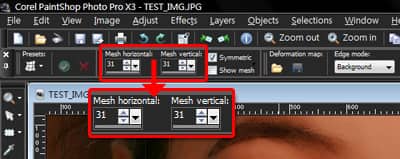
Adjust the mesh size to be small enough to offer several nodes over her eyes. In this case both vertical and horizontal of 31.
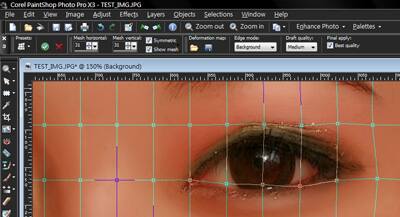
-
We can move the individual nodes around to distort the different features, in this case slightly enlarging her eyes and eyebrows. You really want to use this tool very subtly in order to keep a natural look.
-
There is a somewhat distracting spot on the model's forehead which is not covered with hair. This is also easily fixed. Open the Mesh Warp tool and by moving the points together, close up any bare spots.
-
Make any final minor touch-ups with the Clone brush.
-
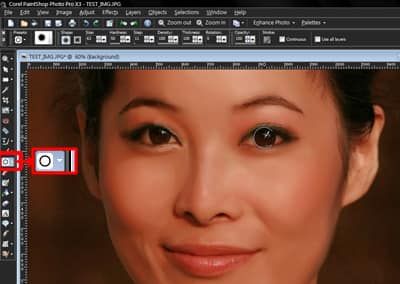
Remember that the eyes are crucial to the way a portrait photo speaks to us. Select the Sharpen tool from the toolbar and click on each eye to sharpen them change the size to fit the eyeball, then click on each - about 2 clicks should do the trick.
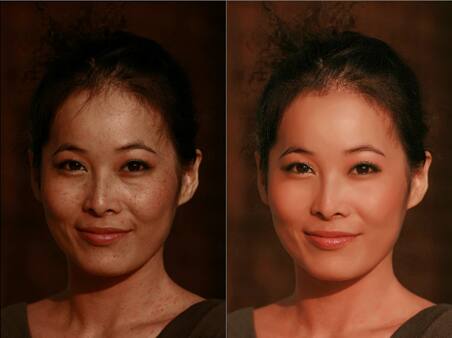
So there you are! At the top of the page, you can see the final Before and After images. Creating a natural-looking glamour-type shot is really easy with PaintShop Photo Pro X3s powerful yet easy tools!
|
|
 |
| |
| 1. |
There are two main ways to photograph people and end up with strong photos. One is the environmental portrait, which includes the person and the immediate surroundings in the frame. The other method is to fill the frame. Here, you make the subject the only thing in the photo, completely filling the frame which means that all of the viewers attention is one the person in the photo.
|


 |
| 2. |
While most people are used to posing for a portrait photo, the best portrait shots reveal something of the inner life of the subject. We often get the most natural results if we encourage a subject to talk, show us something, explain something. Then take many photos as they talk. Remember to continue the engagement with your subject when photographing so that he or she is not just talking to a camera lens all the time. In this way you can then scan through all the photos and the find the ones where the subject is most animated and natural.
|
| 3. |
When photographing portraits, it's important to make sure that the subject's eyes are in sharp focus. This is probably the single most important thing to remember and it applies equally to humans and animals. If the subject is facing at an angle to you, make sure the leading eye is in sharp focus.
|
| 4. |
Cloudy days are great for photography, especially people photography. This filtered light is soft and even, and cloud cover can often help enrich colors and create smooth, flattering shadows.
|
| 5. |
Direct midday sunlight is possibly the worst condition for photos of people. If you have no choice about the time of day, try to find some shade to shoot in. Under a tree, behind a building or under an overhanging rooftop make great options. But if you can schedule your shoot for early morning or late afternoon, the ideal period is about one hour after sunrise or before sunset - its not called the golden hour for nothing.
|
| 6. |
When shooting portraits, longer telephoto lenses are much more flattering than wide-angle lenses. Wide-angle lenses tend to distort features, making noses look big or making people look heavier than they really are. Telephotos compress features, giving a thinning effect. A 50mm fixed-focus lens is an excellent choice for general portrait photography, while using something in the 80mm range, and keeping the subject away from the background, will throw everything behind out of focus for that nice soft bokeh that flatters any face. |
|
|
| |
|
|
 |
 |
 |
 |
|
|
|
|
|
|
|
| |
 |
 |
 |
 |
 |
 |
 |
 |
 |
 |
 |
 |
 |
 |
 |
 |
 |
 |
 |
 |
 |
 |
 |
 |
 |
 |
 |
Light painting
Artist Neil Wade uses simple tools to explore exciting new areas of digital photography. |
Advancing your craft
Check out tips, tricks and tutorials for stop-motion video, portrait makeovers and more |
Take the next step
Digital media is evolving and is beckoning us to stretch into the future. |
VideoStudio Pro X3
 |
Full
Upgrade |
$189.00
$149.00 |
 |
PaintShop Photo Pro X3
 |
Full
Upgrade |
$149.00
$119.00 |
|
Find a store near you |
 |
|
|
 |
 |
 |
 |
 |
 |
 |
 |
 |
 |
 |
 |
|
|
|
|
|
|
|
|
|
|
|
|
|
|