
Occupation/Profession: Professional artist, professional photographer
Employer: Helen Yancy Art and Photography
Location: Plymouth, Michigan
Hobbies: Anything to do with things artistic, and anything to do with children
Corel Painter Master - Helen Yancy
|
Name: Helen Yancy Occupation/Profession: Professional artist, professional photographer Employer: Helen Yancy Art and Photography Location: Plymouth, Michigan Hobbies: Anything to do with things artistic, and anything to do with children |
Biography
How long in my profession:
Long enough to stop counting years. I sold my first oil painting at the age of 12, began working in a photographic studio at 14, and have been doing both forever.
Why did I choose my profession?
I think it chose me. I began early in life knowing I wanted to draw and paint, and I fell in love with photography along the way. Initially I worked for photographers when attending high school to earn the money for art classes, then served photographers in my freelance business painting portraits from—and on—their images. I also gained an international reputation as an airbrush artist and retoucher for photography studios. Eventually I wanted to sing my own song, as it were, rather than be somebody else's accompaniment, and becoming a photographer so I could paint from my own images was a natural step.
My most important accomplishment:
A wonderful marriage, four great kids and 12 perfect grandchildren. I also have been honored to serve the Professional Photographers of America (PPA) on its Board of Directors and as President, the third woman to do so in its 125-year history, along with being the first person to obtain all four of the PPA earned degrees.
A special moment in my career:
I have been very blessed to have had several, among them being honored at the United Nations for Leadership and Service to the photography profession, and most recently when my portfolio of 25 20×24 portraits was accepted by the panel of judges of the American Society of Photographers (ASP) and I received the Fellowship from ASP in July of this year.
It was a special thrill that all were portraits captured digitally and completed as paintings with Corel® Painter™, something that has never been done before.
Helen's web site is www.helenyancystudio.com.
History with Painter
My history with Painter:
It goes all the way back to the purchase of my first really good computer, when I didn't even know how to type and understood nothing, but insisted on the purchase of Adobe Photoshop and a software called Painter, because I just knew it was meant for me. I believe it was Painter's first release, but I'm not sure, and to say I was lost is an understatement. The reason I teach now is because it was so hard to learn then! I played with it a long time before I became brave enough to introduce it to my clients, or to enter competition in a photographic world with my Painter portraits and scenics. But once I did, my industry began to take notice. My images did well in competition, even though they didn't look like traditional photography. They looked like—and indeed, they were paintings done in a realistic style, but paintings nevertheless. Even better—my customers loved them.
Because I was able to introduce a higher end product to photography studios that would increase their bottom line, I began to teach photographers how to use Painter. I had been teaching in the PPA world for 20 years in traditional techniques, so the transition to digital tools 10 years ago was a natural, and very exciting for me and my students.
Corel Painter has set me free! I can embrace all worlds of portraiture, and I express myself in new and exciting ways. If I ever suffered from burnout, Painter changed that, and has done so for so many of my students. For a long time, I was one of the very first evangelists for Painter in the photographic world. Now, many of my students are enjoying success as well, and several are teaching too.
Do I think it's possible to get the same results using other digital painting software?
In my experience, absolutely not! Corel Painter is simply incredible, allowing me to be an impressionist, a realist, an abstractionist, and I still get a kick out of watching the pixels of a straight photograph simply melt into paint before my eyes. I do believe, now that my industry has discovered Painter, the world for Corel Painter is becoming a much bigger world, and I am proud to be a part of that world.
Technique
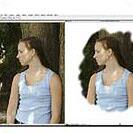 |
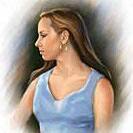
Step 1: I begin working on the scan or digitally captured image by making a clone of the image. Then, working on the clone, I turn on Tracing Paper and use a large-size Soft Cloner brush at 100% opacity to clone back what I need from the subject, leaving lots of white area around the outside edges. I want the watercolor to look loose and "painterly" where it can, and realistic where it needs to be. I save the clone image with a new name and put away the original. I can bring it back if I need to, but since I like to do my painting on layers above the canvas, I don't need to keep the original on my desktop. (figure1) |
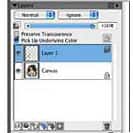 |
Step 2: Working in layers allows me to click the paint layers on and off as needed so I can view the original image. This helps me to preserve the likeness of the subject. |
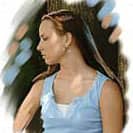 |
Step 3: With loose strokes, I create a soft lovely background bringing color out into the white areas, trying always on this kind of watercolor sketch to avoid a hard rectangle. (figure 3) |
 |
Step 4: |
 |
Step 5: |