
Occupation/Profession: Storyboard/concept artist
Employer: Freelance
Location: Toronto, ON
Corel Painter Master - Dan Milligan
|
Name: Dan Milligan Occupation/Profession: Storyboard/concept artist Employer: Freelance Location: Toronto, ON |
Biography
How long have you been in this profession?
I graduated from the Ontario College of Art and Design in 1984, but I started working professionally a year before I finished school.
Why did you choose this profession?
I can't honestly say that I chose this profession. It's seems more like it chose me. I have always been a "fast and impatient drawer." These qualities are a plus in the world of storyboarding and concept art.
How did you get started?
As luck would have it, I was in my third year of college when one of my professors told me that a large advertising agency was looking to fill a junior storyboard position. She asked me if I did storyboards, and of course I lied and said yes. After faking my way through two interviews, I was hired. I worked in their studio for a year before going on my own.
What are your most important accomplishments?
I think my most important accomplishment would be one that most professional artists strive for: being able to make a good living by doing what you love to do. And that's drawing and painting.
Describe a special moment in your career.
It's difficult to pinpoint one special moment. Again, like most artists, I struggle with my growth as an artist. But there are those special moments when I realize I've made some progress. It's not usually a very "public moment" but rather something I feel on a personal level.
History with Painter
How long have you used Painter?
Eight or nine years. I started with version 3.
Why did you choose Painter?
Painter was the only product on the market that truly simulated what I achieved with traditional mediums. I found it easy to make the transition to working digitally because Painter let me work in the methods I was used to as a traditional artist.
Do you have any interesting/funny/noteworthy stories?
Some people find it hard to believe that I haven't used traditional artist materials in the past eight or nine years. One comment I hear all the time is, "You did that on a computer?!"
What are your five favorite Painter features?
Hm, another tough one. So many great features. In no particular order:
- Brushes, of course; this is the heart and soul of Painter;
- Layers, and all the incredible possibilities they bring;
- Align to path—this is a feature I've been waiting for. Finally, a virtual ruler and a French curve!
What are the features that allow you to distinguish your art?
I don't think there is one particular feature. Painter's true strength is in its ability to let artists use their ability. Simply put, Painter is truly an artist's medium. And it allows the artist's personality to shine through the incredible technology.
Is it possible to get the same results with other painting software?
Personally, I don't think so. Painter feels the most natural to me. Other software (Adobe® Photoshop®) seems a little "cold" and less intuitive to me.
How do you feel about Painter?
Painter has been the cornerstone of my business for the past nine years. It has taken me from working locally to now having clients worldwide. I am now able to produce work faster and with better results then I thought possible. Painter has opened up new opportunities for me that would not have been possible for me working in a traditional medium. My one hope is that Painter (or should I say the talented people that make it possible) continues to consult working artists when they are developing new features. I feel that the last couple of versions were a step back and that worried me. I'm thrilled to see it start moving forward again and take its place at the front of the pack.
Technique
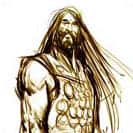 |
Step 1: Using a smooth textured paper and a customized sketching pencil, I do a quick drawing of my character. My sketching pencil is set on grainy build up and I also make it size/pressure sensitive. This gives it a certain brush-like quality. |
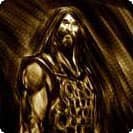 |
Step 2: With a chalk set on grainy build-up, I then work out the values in the piece. Note: I'm using a warm sepia for both my pencil and my chalk because I want the finished painting to have and overall warm and dark feeling. |
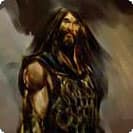 |
Step 3: I create a new layer and set it to multiply. On this layer, I begin to loosely work in tone and local color. Working on a layer allows me to preserve my original sketch. |
 |
Step 4: Once I'm comfortable with the overall color, I flatten the image and begin to paint directly into the piece. At this point, I like to use oil brushes or oil pastels. The nice thing about these brushes is how the color from one stroke mixes and blends with color from another. I will often use the dropper tool to select, then use these subtle new colors that emerge from this mixing. |
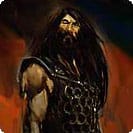 |
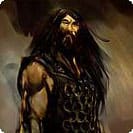
Step 5: I now finish the piece off by adding lights and some details. To add some more color and drama to the painting, I add thick red paint to the background using one of the Artists' Oils. Doing this on a layer allows me to add and subtract the paint with out altering my original image. |