
Occupation/Profession: Professor of Illustration, freelance illustrator
Employer: Columbus College of Art & Design
Location: Columbus, OH
Hobbies: I collect old films, especially animation, on both film and DVD.
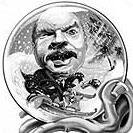
Corel Painter Master - Stewart McKissick
|
Name: Stewart McKissick Occupation/Profession: Professor of Illustration, freelance illustrator Employer: Columbus College of Art & Design Location: Columbus, OH Hobbies: I collect old films, especially animation, on both film and DVD. |
For more information: www.stewartmckissick.com
How long have you been in this profession?
Twenty-two years.
Why did you choose this profession?
I've had a life-long love of drawing and cartooning.
 How did you get started?
I went to art school, and began freelancing and teaching after graduation.
What are your most important accomplishments?
Getting my MFA in illustration and becoming a full professor; having made a living in the arts for my entire career; teaching over 2,500 students at the college level.
Describe a special moment in your career.
The first time I saw my work in a national magazine (a cartoon spot in Field and Stream.)
 How long have you used Painter?
Since I got my first computer, a Power Macintosh® 7100, in 1994—it was version 2.
Why did you choose Painter?
My Dean at Columbus College of Art & Design showed it to me. He was bringing the computer into the curriculum more and more, and he thought as an illustrator it might be of interest to me. I was resistant to the idea of using computers at the time.
Do you have any interesting/funny/noteworthy stories?
I used to make fun of my friends who used the computer, mostly designers and technical illustrators in 1994. I claimed the kind of work I liked to do "traditionally" with watercolor and acrylics could never be done on the computer. I used to proudly profess that you only made "real" art by "taking a stick, putting dirt on it, and dragging it across a tree!" I got my first computer to do my taxes on and write with—or so I thought. Two months after trying Painter, I did my first commercial job with it (using a mouse!). Six months later, I was asked to write and teach a course in it. I've painted all my work digitally since 1995.
What are your top five favorite Painter features?
The ability to mix vector art with pixel art; The control you get with color from image to image, using custom palettes, and the Eyedropper (this feature helps students who are intimidated by color to be less afraid of it); the pressure-sensitive paper textures; the digital watercolor, pastel and airbrush brushes; the ability to layer scanned-in art with digitally created art.
What are the Painter features that allow you to distinguish your art?
See above. I especially love being able to do "digital airbrush." I never had the patience for cutting friskets and repositioning them. With Painter, you don't have to worry about dropping them on the floor and getting dog hair on them!
Is it possible to get the same results with other digital painting software?
Some of the features, yes—but Painter remains the best tool for digitally imitating traditional artists' media, such as watercolor and pastels. The paper feature remains unique in my experience.
How do you feel about Painter?
You can always ask for more speed and stability, but Painter has made tremendous improvements in the last 10 years. I can honestly say it changed my entire working career.
 |
Step 1: I always start with a pencil sketch. I often draw on tracing paper and refine my concept and drawing until I'm satisfied with it. This is then scanned in. |
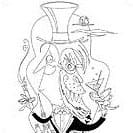 |
Step 2: In this technique, I make a vector drawing of the scan. You can do this in Painter or another vector program, such as Macromedia® FreeHand® or Adobe® Illustrator®. If you use another program, you acquire the image as an illustrator file. The individual shapes show up like layers on the Layers palette. |
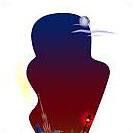 |
Step 3: I preserve transparency and paint on the individual shapes using various brushes in Painter. Preserving transparency allows you only to paint on the vector shapes, which makes them like friskets in traditional airbrushing. I used various airbrushes and also pastels in this example. I usually work from the back to the front as much as possible. You can turn off the shapes by using the eye visibility icons on the layers. In this case, you see only the background. |
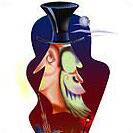 |
Step 4: I continue building the illustration using the individual shapes as self-masking details. If you want to soften an edge or change a shape, all you have to do is turn off preserve transparency. |
 |
Step 5: The finished image. This can make a pretty large file, so I sometimes group and collapse layers as I go along, and always drop the layers when I'm finished. |